Workspaces
If you do not currently have VisualWorks started, you should start it now. VisualWorks initially displays a Launcher and a Workspace. The Launcher contains control widgets for various VisualWorks facilities, as discussed in Chapter 2, and it also includes a Transcript window in the lower part of the window. We will illustrate some of the facilities of VisualWorks using the Workspace for Smalltalk and the Transcript for displaying results. You should resize these windows if needed so that they are large enough for several lines of text.You can type segments of Smalltalk code into a workspace (or most any other VisualWorks window, for that matter) and execute it. For example, type
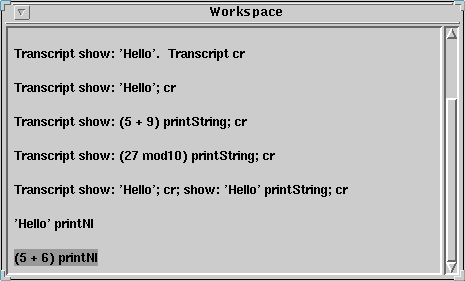
5 + 9
in the workspace. (You should move the cursor down to a new line with the mouse select button and/or the arrow and return keys first.) Now highlight 5 + 9 by dragging the mouse [Select] across the text. From the [Operate] (middle button) menu, note that you can do it or print it. Selecting do it will cause the code to be executed, and selecting print it will cause the code to be executed and the result printed immediately following the code. Select print it and your workspace should look something like
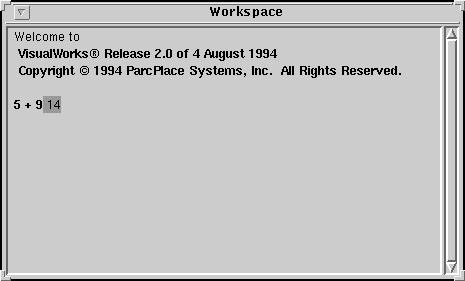
(Selecting do it here will have no visible effect, because evaluating 5 + 9 does not have any external effect (side effect).) Note that the result printed is highlighted, so it can easily be deleted by pressing the Backspace key.
Testing code in this way is useful for code development in Smalltalk and also for debugging. Remember that you can highlight Smalltalk code in most any window and execute it or print its result in this manner. Multiple statements, separated by periods in the usual way, can be executed with a single do it (or print it).
will, when executed, display "Hello" in the transcript beginning at the
current Transcript cursor position. The message cr will then instruct the
Transcript to begin a new line. (Before
executing this to try it, position the Transcript cursor at the beginning of
a new line below the initial messages that are already there.)
Note that it is easier to use cascading here:
Displaying values of classes other than String can usually be done fairly
easily by using the printString message to generate a string representation
of a value. For example, try executing the code
The scroll bars at the right side of a window can be used to scroll up and
down, and a scroll bar at the bottom can be used to scroll left and right.
Windows can be moved or resized in standard ways with the mouse at any time.
Open a browser from the Launcher with a Browse->All Classes selection
or by using the shortcut button
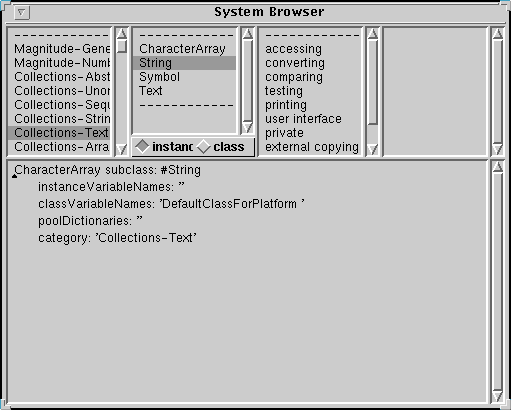
It is sometimes difficult to locate a specific class using the approach that
was just discussed. Any existing class can be found quickly by using the
find class... selection from the [Operate] menu in the Category View
(top left window of the browser). Select the find class... option and
a dialog box will appear. Type the name of the class in this box (you can
just type the name -- it will replace the highlighted text in the class name
box), and then either press Return or select OK. Try this by typing
String as the class name. Your browser should then look something like
We can obtain a browser organized by class hierarchy for a given class by
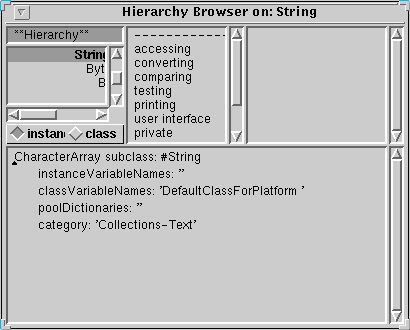
using the spawn hierarchy menu selection in the Class View. Try this
with class String selected, and you should get a new Hierarchy Browser that
looks something like
The indented listing in the Class View of a Hierarchy Browser (there is no
Category View in a Hierarchy Browser) indicates the superclass-subclass
hierarchy for the class on which a hierarchy browser was spawned (String
in this case). For example, we can see here that String is a subclass of
CharacterArray, which is a subclass of ArrayedCollection, etc. Also, String
has subclasses ByteEncodedString, GapString, and Symbol.
A Hierarchy Browser can help us to find a given method for a class more
easily than is generally possible with a standard System Browser. For
example, suppose that we wanted to find the method size for class String.
(This method returns the size of a string.) We begin with a Hierarchy
Browser on String and note that there is no size method in the accessing
protocol (nor any other protocol). Selecting the superclass, CharacterArray,
we see that there is also no size method in this class. Continuing up the
inheritance hierarchy to ArrayedCollection, we find a size method here. So
String instances inherit the size method from ArrayedCollection.
You can close the Hierarchy Browser using the [Window] close
selection.
will have the value n rem: 10.
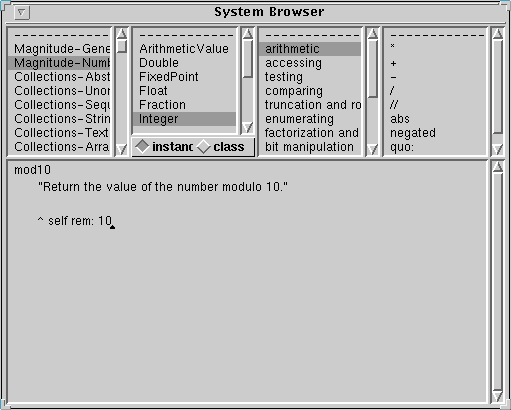
Select the Magnitude-Numbers category, the Integer class, and the arithmetic
protocol in the System Browser. The arithmetic methods will be listed in the
Method View, and a template for a method will be shown in the Code View. We
will modify the template to produce the code for our new method.
First, select the first line of text ("message selector and argument names")
in the Code View and replace it by the name of our new method (mod10). Then
modify the documentation comment to indicate the function performed by the
method. Finally, replace the temporary variable declaration and statements
part by the code for our mod10 method:
Your System Browser should now look something like
Select accept from the [Operate] menu in the Code View and the method
will be compiled and added to the system. It will appear in the methods
list of the Method View.
Test the mod10 method by executing (do it) some statements such as
(This should cause 7 to be displayed in the Transcript.)
We will illustrate the use of file in by implementing methods
print and printNl (which are similar to methods of the same names in GNU
Smalltalk) to make it easier for us to display
results in the Transcript. The method "print" will cause its receiver to
display its printString in the Transcript without a newline (cr) and "printNl"
will cause its receiver to display its printString followed by a newline.
Create a file named "print.st" in the directory from which you started
VisualWorks, and put the following text in the file:
This code implements print and printNl as methods for class Object. Thus all
classes will inherit them. (The test for a string in method print is done
because the printString for a String inserts apostrophes around the String
value. You can see this by executing code such as
in a workspace, which will display
in the Transcript.)
The easiest way to file in an external file is to use a File List,
as was illustrated in Chapter 2. Open a
File List
from the Tools->File List option in the Launcher or by using the
shortcut button
Load the methods that are defined in the file print.st into
VisualWorks by selecting
file in from the Names View [Operate] menu. As the file is compiled,
messages will be displayed in the Transcript indicating what is happening.
If an error (syntactic or semantic) occurs, then the file in
terminates. You can correct the error by editing the file in the File Edit
window, saving it using the save option in the File Edit [Operate] menu,
and filing it in again.
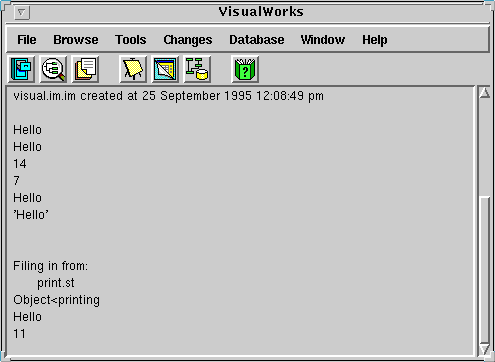
After successfully filing in print.st, you can test it by executing code
such as
and
Your Launcher and Workspace should now look something like
Close the File List using the close selection in the [Window] menu.
Important Note: It is important to explicitly close each File List,
rather than just exiting VisualWorks. On some systems, exiting VisualWorks
without closing a File List will leave the File List running in a
compute-bound mode, so that it will use every available cycle of cpu time
even after the user has logged off.
Select the category Magnitude-Numbers, class Number, protocol arithmetic, and
method rem: in the System Browser. The code for method rem: should be in the
Code View. Change the line of code by appending "+ 1" to the end of the
line:
Now before changing anything, set up a test in a workspace:
and if you still have the mod10 method in your image a more interesting
test is
Execute (do it) this code, and the correct answer(s) should be displayed
in the Transcript:
Now replace the rem: method by choosing accept from the [Operate] menu
in the Code View of the System Browser. If there is no error indication,
the new code for rem: has been compiled and entered into the system. To see
this, execute the above code again, which will now give:
Remove the "+ 1" that was previously inserted into the code for rem:,
accept the revised code, and test again to make sure that rem: now
works properly.
We will add a new class "Random2" as a subclass of existing class Random.
An instance of class Random returns random numbers in response to the
message "next". To see how this works, instantiate a random number by
executing code such as
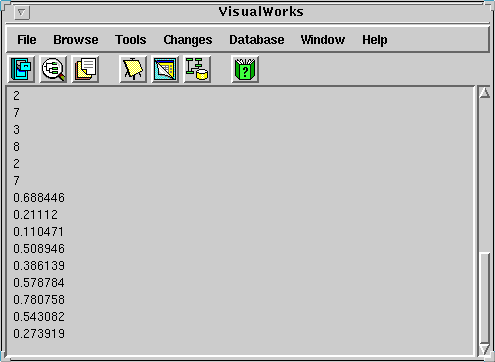
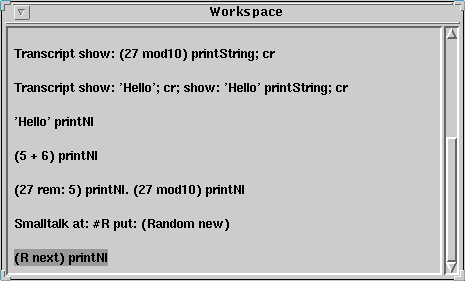
Now generate and display in the Transcript several random numbers by
executing
several times. The result of R next is a random number
(Float) between 0.0 and 1.0, so your Launcher and Workspace should now look
something like
(The random numbers in your Transcript will probably be different from those
shown here.)
We will implement a new class, Random2 as
a subclass of Random, where Random2 will also include a method between:and:
to return a random integer between two given integer values. (Note that
we could just as well have just added the between:and: method to class
Random.)
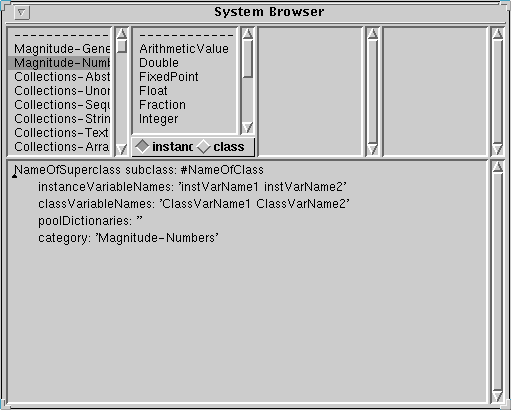
In the system browser, select category Magnitude-Number with no class selection.
There will then be a class template in the Code View:
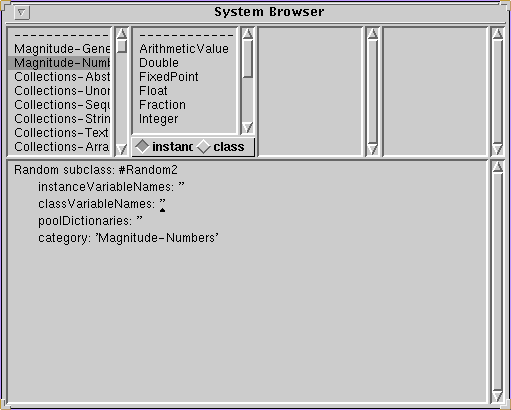
Edit the class definition template to define Random2 as a subclass of
Random, with no instance variables nor class variables:
Compile the new class definition by using accept from the [Operate]
menu of the Code View.
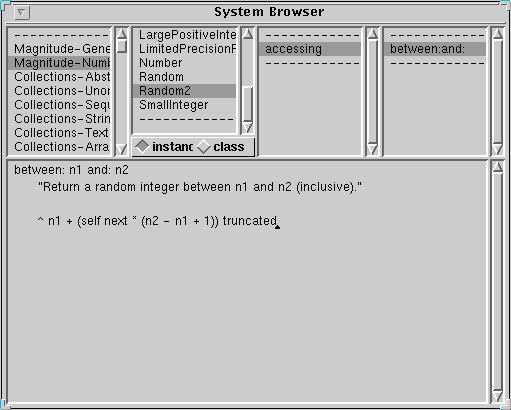
Next we add the method between:and: in protocol accessing of class Random2.
First, add the protocol ("accessing") by choosing add from the
[Operate] menu of the Protocol View. (Class Random2 should be selected in
the Class View.) Type the new protocol name (accessing) into the dialog
window and Return to record the new protocol.
Now edit the Code View window to contain the code for between:and:,
and accept. The method name should appear in the Method View, and
your System Browser should now look something like
We have now added the new class and method. Test it by executing code such as
and then execute the following several times:
This should display several random integers between 4 and 11 in the
Transcript.
To see how this works, we will save the Random2 class that was just added.
From the System Browser with the Random2 class selected, choose
file out as... from the [Operate] menu in the Class View. A dialog
window should appear with the file name Random2.st highlighted. Change the
file name if desired, then select OK to file out the class. This file
can later be filed in to reinstall the Random2 class, and this is left as an
exercise for the reader.
The Transcript
The transcript window in the lower part of the Launcher is associated with the
Smalltalk global variable "Transcript". Transcript is an instance of the class
TextCollector that allows text to be displayed in the transcript window.
Strings can be displayed in the transcript window by sending a show: message
with a string argument to Transcript. For example,
Transcript show: 'Hello'. Transcript cr
Transcript show: 'Hello'; cr
Transcript show: (5 + 9) printString; cr
Editing in VisualWorks Windows
Editing in a VisualWorks window is done by using procedures that are
fairly standard for screen-based editors.
Text that is typed is inserted at the cursor position. Replacement of text
can be done by selecting the text (by dragging the mouse across it, or
double-clicking to select a word, etc.), and then using the Backspace key to
delete it or just typing its replacement to replace it. Cursor movement can
be done using the arrow keys or by selecting the new cursor position with the
mouse.Using a Browser
A browser can be used to inspect the definition, comments, and code for all
catagories, classes, and methods in the current image, both those
that are provided in the
initial image (i.e., the "built-in" classes and methods) and those that are
added by the VisualWorks user. We will illustrate some of the uses of a
browser in this section. . The classes are
listed by category in the top left sub-window (the Category View). Select
"Collections-Unordered" and the classes in this category will be listed in the
next sub-window (the Class View). Select "Dictionary" and the protocols for the
methods in class Dictionary will be shown in the next sub-window (the Protocol
View). Select "accessing" from the Protocol View and the methods for this
protocol will be listed in the rightmost sub-window at the top (the Method
View). Finally, select "at:put:" in the Method View, and the code for the
at:put: method is displayed in the bottom window (the Code View). Your browser
window should now look like this:
. The classes are
listed by category in the top left sub-window (the Category View). Select
"Collections-Unordered" and the classes in this category will be listed in the
next sub-window (the Class View). Select "Dictionary" and the protocols for the
methods in class Dictionary will be shown in the next sub-window (the Protocol
View). Select "accessing" from the Protocol View and the methods for this
protocol will be listed in the rightmost sub-window at the top (the Method
View). Finally, select "at:put:" in the Method View, and the code for the
at:put: method is displayed in the bottom window (the Code View). Your browser
window should now look like this: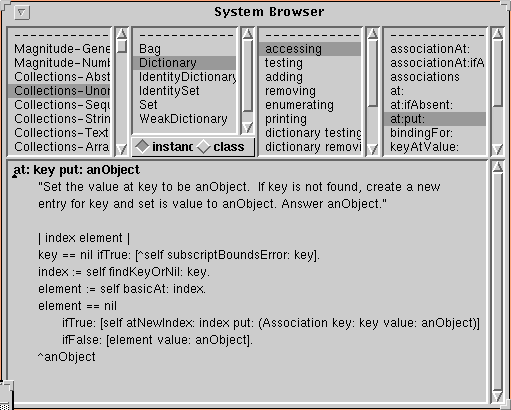
Adding a New Method
In this section we illustrate how a new method can be added to those in the
current image. We will add a method "mod10" to the Integer class that will
return the value of an Integer modulo 10. That is, for an Integer n,
n mod10
^ self rem: 10
Transcript show: (27 mod10) printString; cr
Adding New Classes or Methods From External Files
Classes, methods, or other code can be entered into the VisualWorks system
by using the file in selection from various [Operate] menus. A file
that is filed in must be in an external file format, which uses exclamation
points to delimit class definitions, protocols, and methods. (This is the
same format as is used for top-level input to GNU Smalltalk.)
!Object methodsFor: 'printing'!

print
	"Display the object in the transcript window;
         leave the cursor at the end of the object's print string."

	( self isMemberOf: ByteString )
		ifTrue: [Transcript show: self]
		ifFalse: [Transcript show: self printString]!


printNl
	"Display the object in the transcript window, and start a new line"

	self print.
	Transcript cr ! !
Transcript show: 'Hello' ; cr; show: 'Hello' printString; cr
Hello

'Hello'
 .
In the first input field (the Pattern View) enter * and then Return,
so that all the files
in the local directory will be listed. Select the file print.st from the
Names View, and the contents of the file that you created will appear in the
bottom (File Edit) window. (Note: You can also use the File Edit window
to create and edit files. Editing options are included in the File Edit
[Operate] menu.)
.
In the first input field (the Pattern View) enter * and then Return,
so that all the files
in the local directory will be listed. Select the file print.st from the
Names View, and the contents of the file that you created will appear in the
bottom (File Edit) window. (Note: You can also use the File Edit window
to create and edit files. Editing options are included in the File Edit
[Operate] menu.)
'Hello' printNl
(5 + 6) printNl
Changing Existing Methods
Any method (or class) that is in the system can be changed (or removed) in
much the same way as new code can be added. We will illustrate by changing
the rem: method for Number to return a result that is 1 larger than the
correct result.
^self - ((self quo: aNumber) * aNumber) + 1
(27 rem: 5) printNl
(27 rem: 5) printNl. (27 mod10) printNl
2

7
3

8
Adding a New Class
In this section we illustrate how to add a new class using a System Browser.
(This is the intended way in which classes and methods are to be added.)
Smalltalk at: #R put: (Random new)
(R next) printNl
between: n1 and: n2
	"Return a random integer between n1 and n2 (inclusive)."

	^ n1 + (self next * (n2 - n1 + 1)) truncated
Smalltalk at: #R2 put: (Random2 new)
(R2 between: 4 and: 11) printNl
Saving Code into a File
As was briefly discussed in Chapter 2,
the entire current image can be saved
at any time, and later it can be used to restart VisualWorks from that saved
state. However, an image is fairly large, and it is more efficient to save
small modifications as external code files that can later be filed in to
retrieve previous work.

